The history of the SCS Curve Number method has always fascinated me. Over the years, water
resources engineers have used both manual and automated approaches to compute CN values. This
page is a short tour of where the method came from and three practical ways to build a CN
raster for a study area: with the ArcGIS Pro built-in tools, with ArcHydro, and with a free
web app I built. Pick the one that fits the data and the time you have.
// a short history
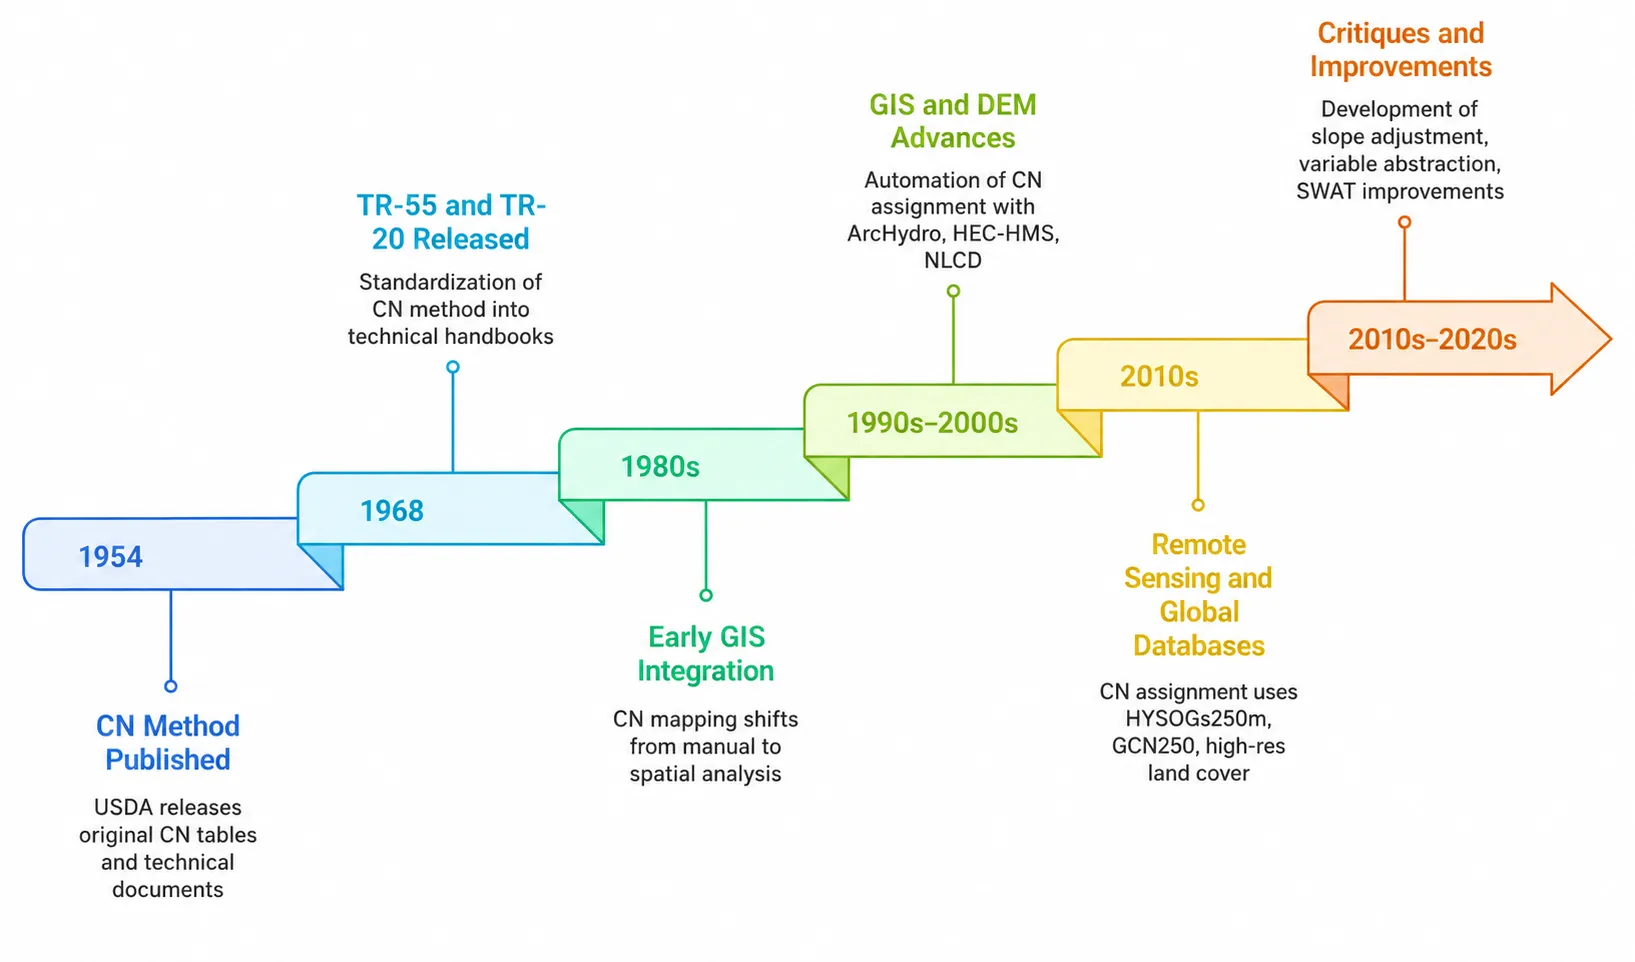
The SCS Curve Number method was published in 1954 alongside the original CN tables and
technical documents. TR-55 and TR-20 (1968) brought it into standard practice. GIS
integration started in the 1980s and accelerated through the 1990s and 2000s as DEMs
and the supporting tools matured. Remote sensing and global land-cover databases
(MODIS, HYSOGs250m, GCN250, finer-resolution NLCD) shifted CN work to the regional and
continental scale in the 2010s. The current decade is mostly about refinements: slope
corrections, variable abstraction, and links to fully distributed models such as SWAT.
// fundamentals
What a curve number actually is
The basics, for context, before the three methods below.
In the SCS CN method, the curve number is a single dimensionless parameter, between 30
and 100, used to estimate direct runoff from a rainfall event in a given watershed. It
rolls land cover, hydrologic soil group, hydrologic condition, and antecedent moisture
into one number. Higher CN means less water infiltrates, so more becomes runoff.
Each combination of land cover and soil hydrologic group maps to a specific CN through
empirical tables. With CN known for every cell of the watershed, runoff volume from a
given storm follows directly. The method is widely used in stormwater design, flood
studies, and watershed modeling because the inputs are easy to come by and the math is
well understood. It is intentionally simple, which means the limits matter: it does not
replace fully distributed runoff models in complex hydrologic settings, and it is best
used within its intended scope.
// three approaches
Three ways to build the CN raster
Same destination, different tradeoffs. Pick by data, time, and the tools you already have.
01
ArcGIS Pro built-in tools
If you already work in ArcGIS Pro, this gets you to a CN map without installing anything extra.
02
ArcHydro tools in ArcGIS Pro
The fullest workflow: delineate the watershed, derive flow direction and accumulation, and produce the CN raster, all in one extension.
03
SCS Curve Number Generator (web app)
A Python web app I built that returns CN values for any watershed in seconds, no desktop GIS required.
// method 01
ArcGIS Pro built-in tools
A walk-through that uses only the tools that ship with ArcGIS Pro. CN values come from the standard land use / hydrologic soil group tables, applied through the built-in raster and zonal operations.
For the source data, see the soil and land use videos in the resources section below.
// method 02
ArcHydro tools in ArcGIS Pro
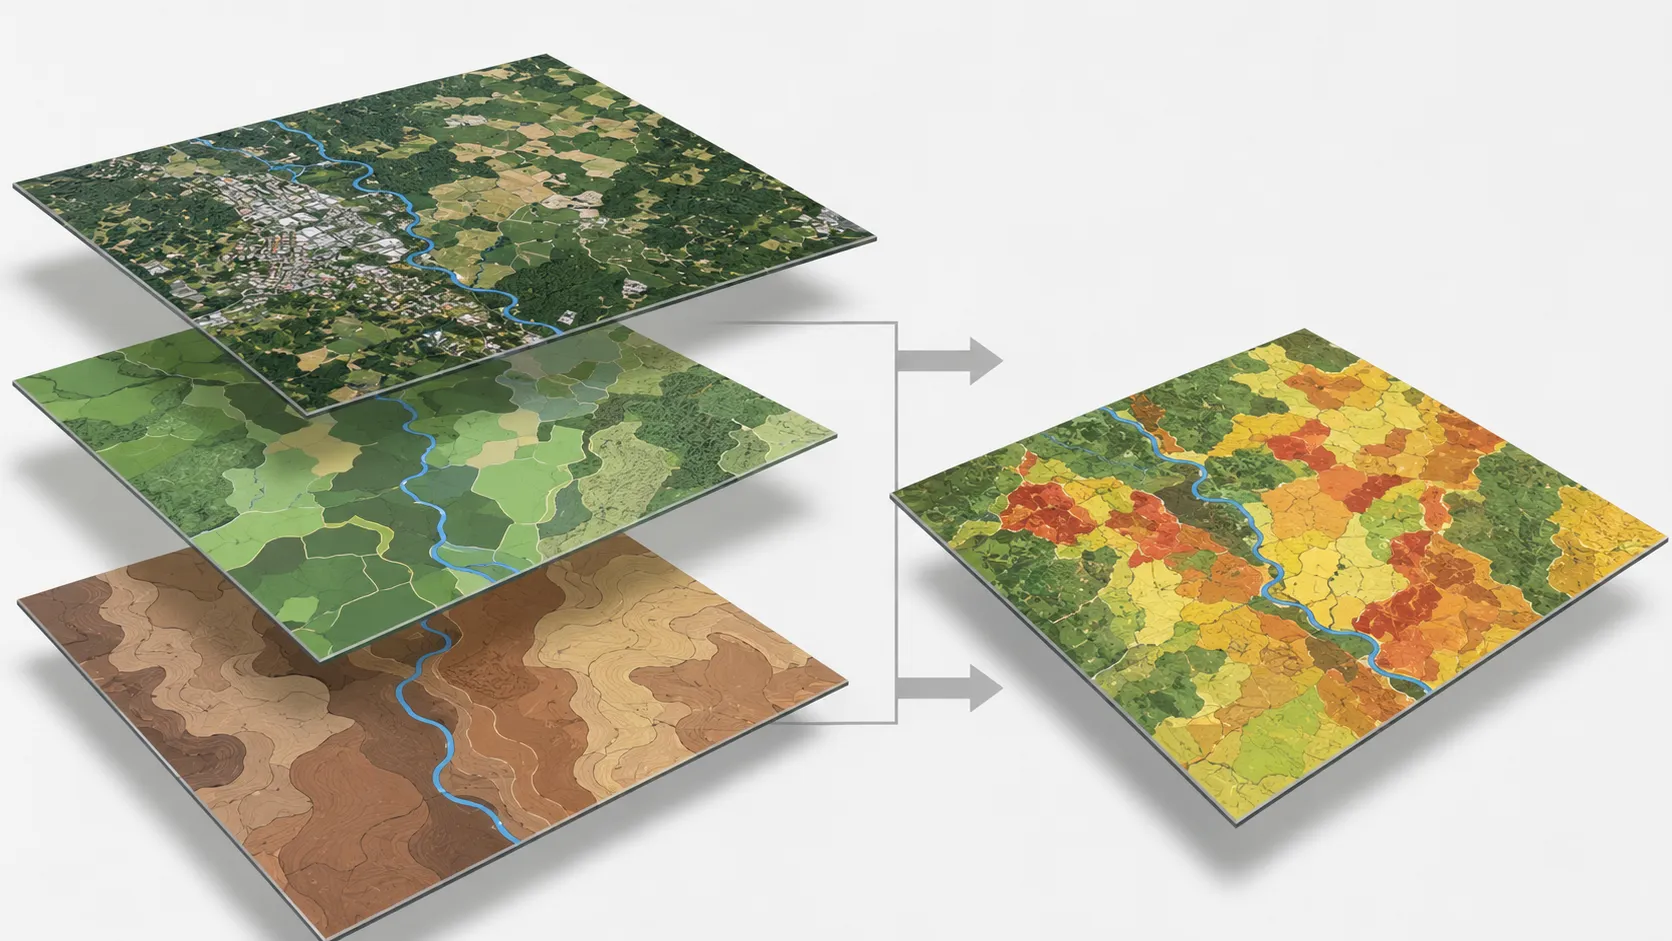
ArcHydro is Esri's free hydrology toolset for ArcGIS. It packages watershed delineation and the CN workflow into one extension. The conceptual sketch below shows how soil, land use, and the basemap come together into the final CN raster.
Soil + land use + topography combine, cell by cell, into one CN raster.
Data and software you'll need
A digital elevation model (DEM)
A high-resolution DEM of the study area, for deriving flow direction and accumulation and for delineating the watershed.
Land use and land cover (LULC)
Land cover classes for the study area, used to assign hydrologic groups and the corresponding curve numbers.
Soil data
Soil types and properties for the study area. Different soils infiltrate at different rates, which is what drives the CN assignment.
GIS software
A GIS package such as ArcGIS Pro or QGIS to process and analyze the spatial data, run the calculations, and make the maps.
Where to get the data and the tools (United States)
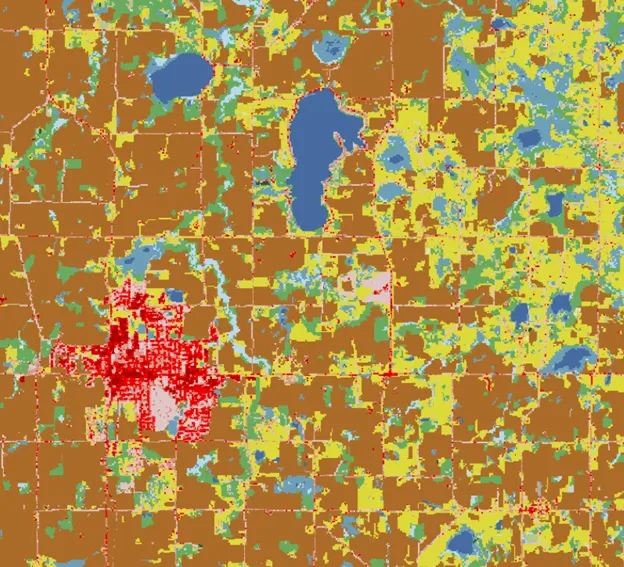
An example CN raster output for a small watershed. Red cells are impervious or near-impervious; greens and blues are vegetated or open water.
// method 03
SCS Curve Number Generator (web app)
A dedicated CN Generator app I built and maintain: a Windows one-click executable if you just want results, and a Python source distribution if you want to look under the hood. Provide your soil and land-use vector files (and optionally a watershed boundary), and the app builds the CN map and the statistics that go with it. Everything runs on your machine, in your browser; nothing is uploaded to a remote server.
CN Generator
A local, open-source SCS Curve Number toolkit built around the NRCS methodology and USACE HEC-HMS
guidance for spatial CN assignment. Drop in your soil and land-use layers, choose a lookup table, and
the app handles CRS alignment, dual-group resolution, the spatial overlay, raster export, and zonal
statistics. Everything runs on your own machine, in your browser; nothing is uploaded.
Windows app (.exe)Python 3.10+Gradioruns locallyfree for personal use
Windows zip package. Download CN_Generator_Windows_<version>.zip from
the GitHub Releases page, extract, and double-click CN_Generator.exe. No Python install
required. This is the easiest path for anyone who just wants to use the tool.
Source code, from Python. Clone the repo, create a virtual environment, install
requirements.txt, and run python app.py. Use this if you want to read the
code, adapt it to your workflow, or build your own release.
01 What it does
Aligns coordinate systems automatically across the soil and land-use layers, so you do not have to reproject anything by hand.
Resolves dual hydrologic groups (A/D, B/D, C/D) into the more restrictive group, the standard convention.
Spatially intersects soil and land use and assigns a Curve Number to every polygon from a built-in NLCD lookup table (or your own CSV).
Dissolves polygons by CN value and computes areas, then rasterizes the result to a GeoTIFF ready for HEC-HMS or HEC-RAS.
Computes zonal statistics per watershed when a boundary is provided: area-weighted CN, mean, min, max, and counts.
Builds an interactive Folium map with tooltips and a runoff-potential legend so you can sanity-check the result in the browser.
Exports a clean set of files: a GeoPackage of CN polygons, a GeoTIFF raster, an HTML report, an interactive map, and an optional Excel summary.
02 What it expects
Soil vector with a hydrologic soil group field (A, B, C, D, or dual forms A/D, B/D, C/D)
Land-use vector with a numeric class code field (NLCD class codes work out of the box)
Watershed boundary(optional, for zonal statistics)
Custom CSV lookup(optional, otherwise uses the built-in NLCD table)
03 What it returns
GeoPackage of CN polygons
GeoTIFF raster, the CN map ready for any downstream model
HTML report with overall statistics
Interactive Folium map with legend and tooltips
Excel summary of watershed-level stats (optional)
04 Sample data to try it on
A working HUC10 example ships with the app so you can try the full workflow without hunting for data. In
data/HUC10 Example/ you will find:
SoilData_SandCreek.zip soil layer for Sand Creek
NLCD2024_SandCreek.zip matching land-use layer
SandCreek_HUC10.zip watershed boundary
a small spreadsheet with expected results so you can verify the output
05 Built with
Python 3.10 or newer (3.11 recommended) and a small set of well-tested geospatial libraries. The pinned
versions live in requirements.txt; the table below highlights the ones doing the real work.
Gradiobrowser UI, form handling, and the local dev server
GeoPandasspatial vector dataframes, joins, and overlays
Shapely + pyogrio + Fionageometry operations and vector file I/O
Rasterio + rioxarraywriting the GeoTIFF output raster
rasterstatszonal statistics per watershed
Folium + leafmapthe interactive Leaflet map in the browser
pandas + NumPytables, arrays, the lookup table merge
dask + dask-geopandasparallel processing for larger study areas
WhiteboxToolsauxiliary geospatial operations
Under the hood the code lives in single-purpose modules in src/:
curve_number_calculator.py handles the lookup and dual-group logic,
spatial_operations.py does the CRS work and the overlay,
cn_statistics.py does the zonal math, and visualization.py
builds the Folium map and the HTML report. app.py is the Gradio front end
that wires them together.
06 Install and run: Windows zip
The path most people should take. You do not need Python installed.
Go to the Releases page and download CN_Generator_Windows_<version>.zip.
Right-click the zip and choose Extract All.
Open the extracted folder and double-click CN_Generator.exe.
Keep the app window open while you use the tool; closing it stops the local server.
If Windows SmartScreen shows a warning on first run, click More info, then
Run anyway. The package is unsigned (it is a small personal release), which is why the
warning appears.
The zip also includes example data under Sample Data\HUC10 Example, a
Create_Shortcuts.bat helper if you want a Desktop shortcut, and a brief README for zip users.
07 Install and run: source code
Use this path if you want to read the code, tweak it, or build your own release. Python 3.10 or newer;
3.11 is what I develop against.
git clone https://github.com/mohsennasab/CN_Generator.git
cd CN_Generator
python -m venv .venv
.venv\Scripts\activate           # on Windows
# source .venv/bin/activate      # on macOS or Linux
python -m pip install --upgrade pip
python -m pip install -r requirements.txt
python app.py
On Windows there is also a CN_Generator.bat launcher that creates the venv, installs
everything, and starts the app in one step. Once running, Gradio opens at
http://127.0.0.1:7860.
08 License and use
CN Generator is free for personal, non-commercial use. Study it, run it on your own
projects, use it for coursework, learn from it, share it, all fine.
For commercial use, including paid consulting, internal business use, client
deliverables, training, workshops, course material, demonstrations tied to paid services, and videos or
media produced for commercial purposes, please get in touch through
hydromohsen.com to arrange a license.
The software is provided as-is, without warranty. Always verify results before using them in analysis,
design, or decision-making.
Source data, the theory behind the curve number, and the related pieces of a hydrologic study (rainfall, unit hydrographs).
01
Download and process soil data for your watershed
How to download and pre-process SSURGO soil-texture data for hydrologic and watershed modeling. Soil characteristics drive infiltration and runoff, so getting them right early pays off later.
02
Download and process land use and land cover data for your watershed
A step-by-step walk-through of getting and preparing NLCD land use and land cover data for hydrologic and watershed analysis.
03
NRCS Curve Number method: the theory
The NRCS (formerly SCS) Curve Number method is an empirical approach for predicting rainfall excess and infiltration. The four videos below build the theory; watch in order.
Part 1 of 4
Part 2 of 4
Part 3 of 4
Part 4 of 4
04
Download NOAA Atlas 14 rainfall-frequency estimates from PFDS
How to download NOAA Atlas 14 rainfall-frequency estimates from the Precipitation Frequency Data Server (PFDS) for hydrologic and watershed modeling. Choosing the design storm is one of the first steps in a hydrologic study.
05
Unit Hydrograph theory and application
A two-part series. Part 1 covers the theory and assumptions behind Unit Hydrographs. Part 2 shows how to build and use one in a modeling project.